How to Migrate Universal Analytics (UA) to Google Analytics 4 (GA4) - A Step-by-Step Guide

Google’s Universal Analytics (UA) has been the go-to web analytics solution for businesses to track and measure their online performance. However, recently Google announced a more advanced version of their analytics platform named GA4. In this comprehensive guide, we will first discuss the importance of moving from UA to GA4, the benefits it offers, the steps involved in the conversion process, and the potential complications you may encounter.
Benefits of Converting from Universal Analytics to Google Analytics 4
Let’s first get this out of the way, the choice to make the switch is indeed required to continue collecting data with Google. It is a mandatory step to transfer all of your previous properties to GA4.
Google Analytics 4 is much more advanced than the previous version of Google Analytics called GA3 or Universal Analytics. Firstly, GA4 provides a holistic view of the customer journey across multiple touchpoints and devices. With enhanced cross-platform tracking, you can gain valuable insights into how customers interact with your brand at different stages, allowing you to optimise your marketing strategies accordingly. Additionally, it also addresses the privacy concerns of the audience.
Improved Data Collection and Reporting Features
With GA4 comes new data collection methods through machine learning and reporting capabilities that provide deeper insights into user behaviour. The enhanced event tracking and measurement options enable you to track custom events and actions, empowering you to measure the success of specific marketing campaigns and initiatives.
Advanced Audience Segmentation and Insights
GA4 offers advanced audience segmentation, allowing you to create custom audience segments based on various attributes. These segments can help you identify high-value customer groups, personalise marketing messages, and improve overall targeting and conversion rates.
Better Integration with Google Ads and Other Platforms
GA4 seamlessly integrates with Google Ads, enabling you to unlock powerful advertising features. The improved integration allows for more accurate attribution modelling, retargeting options, and detailed campaign performance analysis.
Streamlined Event Tracking and Customization Options
GA4 simplifies event tracking and customization, making it easier to define and track specific user actions and behaviours. The flexible event model enables you to set up and measure events relevant to your business goals, providing deeper insights into user engagement and conversions.
Steps to Migrate UA to GA4
“On July 1, 2023, this property will stop processing data. Starting in March 2023, for continued website measurement, migrate your original property settings to a Google Analytics 4 (GA4) property, or they'll be copied for you to an existing GA4 property, reusing existing site tags.”
Users will have started seeing this message on their Google Analytics dashboard starting Feb 1, 2023. The time to act is now.

UA will stop processing data from July 1, 2023
For some accounts, Google has already created a new property named GA4 under the same account. However, if you don’t see that in your dashboard, we highly recommend that you do it on your own and migrate everything possible instead of letting Google handle that. If Google automatically creates one for you, you might lose some of the data if you already have extensive lists of data in your Universal Analytics account.
Setting Up a GA4 Property
Start by creating a new GA4 Property within your Google Analytics account. Follow the step-by-step process provided by Google to set up the property and configure the basic settings.
Creating a Property

When you click the ‘Go to Setup Assistant’ shown in the pink countdown chart above, it takes you directly to create a new property. At this step, make sure that there is no other GA4 property already in the account. Once you click ‘Create a New Property’, you will be asked for basic information about your name and URL. Once you fill this out, a property will be created and you will be prompted to the next step, to ‘Create Streams.’
Creating Streams
When you get to this step, select each type of data stream and keep filling in the details for each, and creating the streams for your website, and apps. The web represents your website, IOS represents your Apple App and Android is your Android-supported app.

Data Streams in GA4
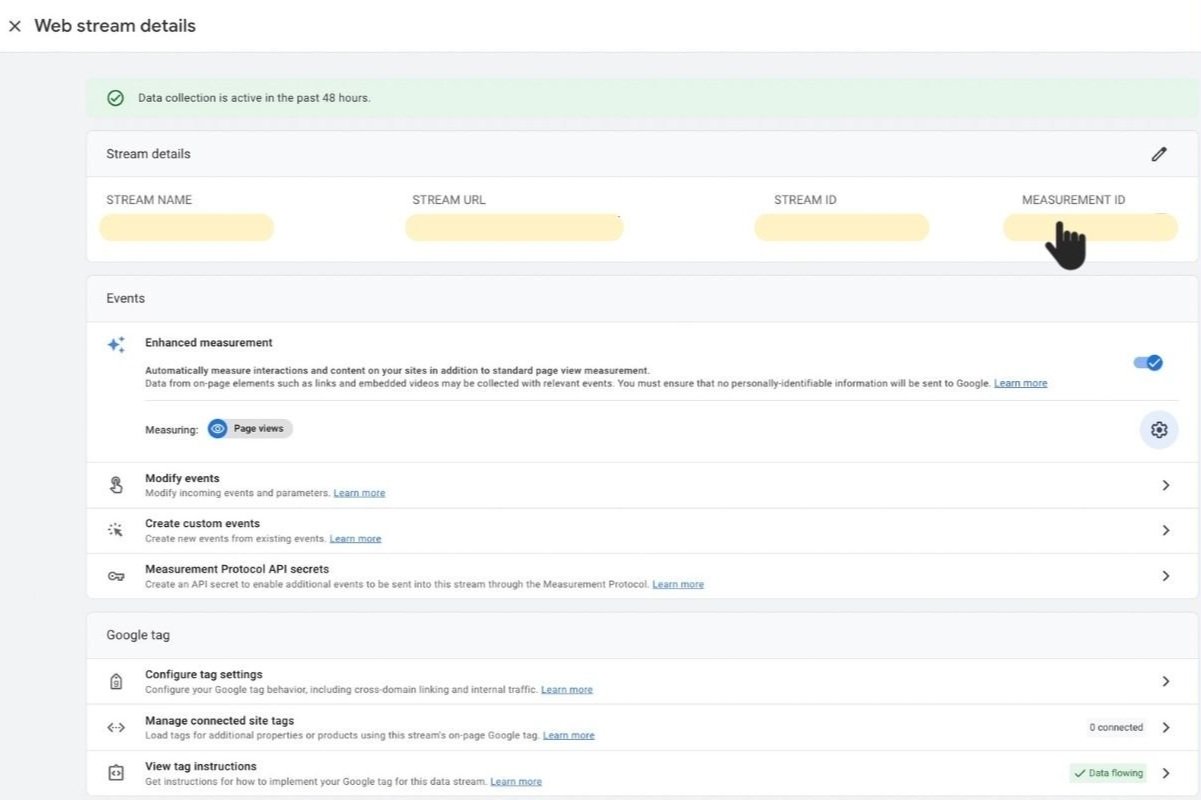
Once you create the streams, click each stream and go into the ‘Web Stream Details’. On this page, you will configure all settings applicable to each stream.

Turn on ‘Enhanced Measurement and click on Page Views’. Go to the right settings icon and click on all settings that apply to your Streams such as Page Views, Scrolls, outbound clicks, and so on (as shown in the picture below). Turn these on if you want to collect data for these.
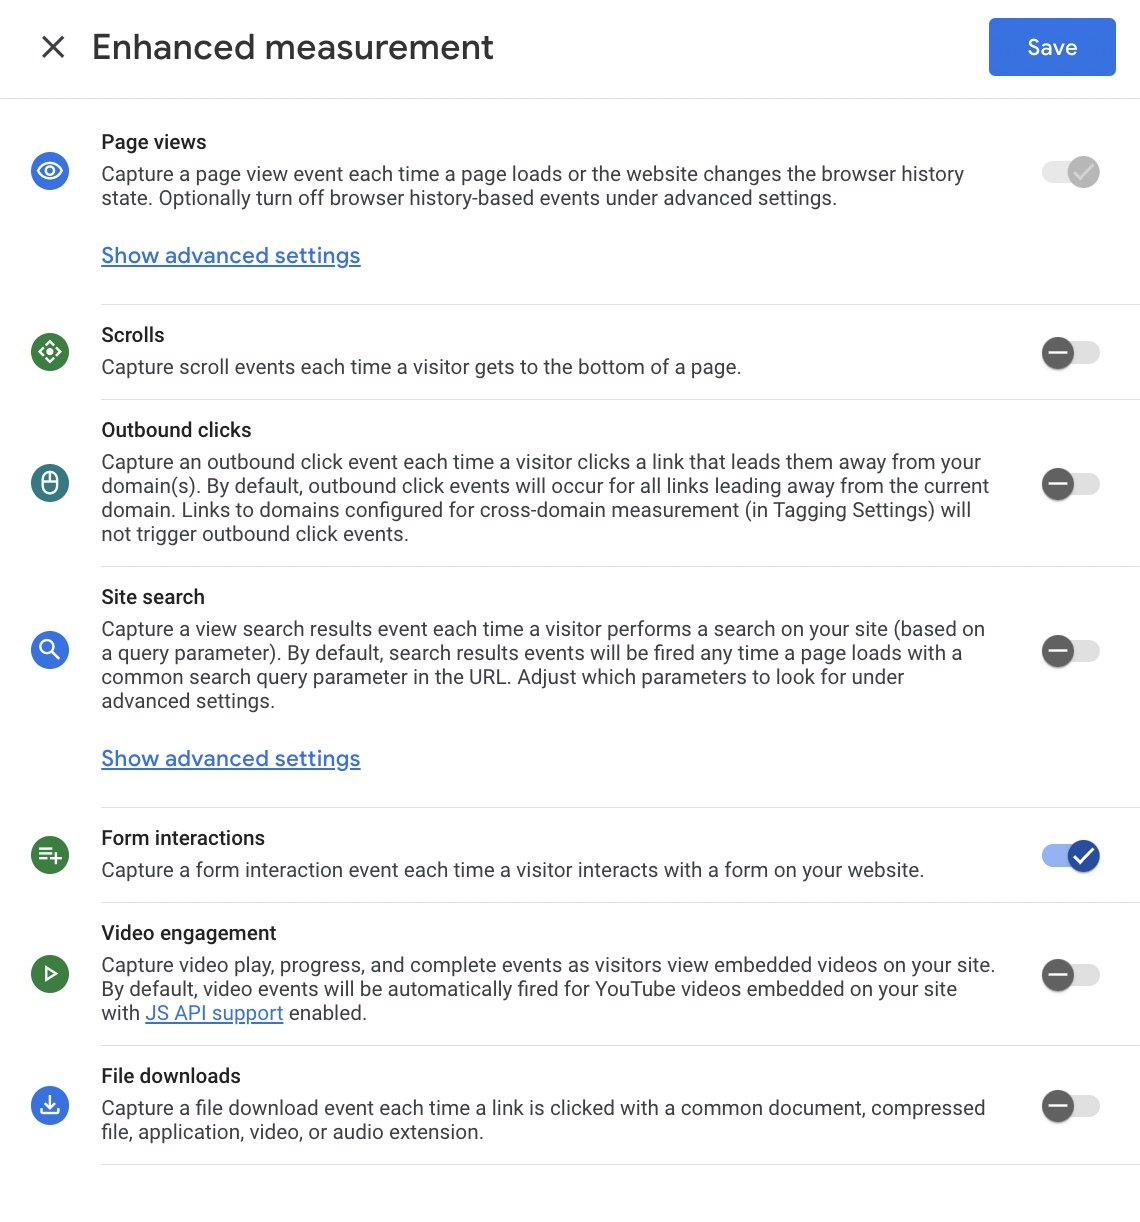
When you are done with the Enhanced measurement step, save it and go back to the previous page as shown below.
You will find a MEASUREMENT ID on this page at the top under the Webstream details page, next to the Stream Name, URL, and ID. Copy the aforementioned ‘MEASUREMENT ID’ and paste/save it somewhere handy for future reference.

Install the GA4 Tracking Code
Now that you have created your Streams (web, app), you need to connect those to the GA4 by installing a tracking code on your website. You can do this in two ways, either by adding the tracking code via Google Tag Manager (which is recommended) or via adding a JavaScript snippet to your website.
OPTION A - Installing with Google Tag Manager (GTM)
Go to your GTM in your dashboard, you will find this next to your account Master View tab. Once you are inside the tag manager tab, click ‘Tags’ in the navigation menu on the left-hand side of the screen. Click on ‘New’, then under the ‘Tag Configuration’ section, select ‘Google Analytics: GA4 Configuration’.
Now is the time to use the MEASUREMENT ID that we got earlier.
Add this MEASUREMENT ID to the tag and then rename the tag to ‘GA4 Configuration’. In the ‘Triggering’ section, add ‘all pages’ as the trigger. Once the trigger has been added, click Save in the top right corner.
Finally, click ‘Preview’ in the top right corner of GTM to test if the tag is working. Once the page loads, you should see the tag firing. Finally, once you confirm the tag is firing, publish the container.
Option B Installing without Google Tag Manager (GTM)
Click on WebStream details, find the Configure tag settings below, and click it which will bring you to the tag installation instructions.

Click on the installation instructions as shown in the pic below.

Google tag Installation with GA4
There are two ways you can use to install the GA4 code on your website without Google Tag Manager.
B1) Installing with a website builder
Installing with a website builder or CMS is very easy if your website is showing in the above-mentioned list of compatible options.
Add your website domain in the tab shown in the picture below and click scan. It will tell you the detected platforms depending on your domain. Click the suggested platform and it will give you the exact steps to install on your website.

B2) Installing Javascript On Your Website Or App
The second way to connect your analytics to your website/app is to add a JavaScript snippet to your website’s header. This code is what allows GA4 to track and analyse the traffic to your site. Go to the ‘Admin’ page and click on the ‘Data Streams’ tab. Scroll down to view tag instructions and click ‘Install Manually’.

Install Google tag
For Web: Install the GA4 global site tag (gtag.js) on all the web pages you want to track. Place the following code snippet within the <head> section of each page, replacing ‘GA_MEASUREMENT_ID’ with the Measurement ID obtained in step 6.
For Apps: For Android apps, add the Firebase SDK to your app by following the instructions provided by Firebase.
For iOS apps: Integrate the Google Analytics SDK by following the instructions provided by Google.
Verify That The Tracking Code Is Working
Once you’ve installed the tracking code on your website, it is essential to verify it is working correctly. To do this, go back to GA4, click ‘Reports’, and finally, click on the ‘Real Time’ tab. This report will show you a live view of the traffic on your website, including the number of active users and the pages they’ve visited. If there is no data shown, open your website in a new browser and click a few pages on your website. Come back to the Analytics dashboard and you will find one user in the REAL TIME reports section with your location and the time you were on the website.
This ensures that the tracking code is working properly, and GA4 is successfully tracking your website traffic. However, if you don’t see any active users, it could mean that there is a problem with the tracking code or that it wasn’t installed correctly. Should GA4 not show any active users, simply go back and confirm all the above steps again to troubleshoot.
This is the first step of starting your GA4 dashboard so it can begin collecting data.
Subscribe to our blog and find out how to migrate all the data from UA to GA4.